SSOとは
SSOとはSingleSignONの略称です。
1回のログインで複数のシステムにログインできる機能を指します。
身近な例ですと、GoogleやTwitterとは関係のないシステムにGoogleアカウントやTwitterアカウントでログインできるシステムを思い出してほしいです。。
認証方式
以下のような認証方法がある。
- 代行認証方式
- リバースプロ式方式
- エージェント方式
- SAML認証方式
今回はSimpleSAMLPHPを使用するため、SAML認証方式となる。
構成要素
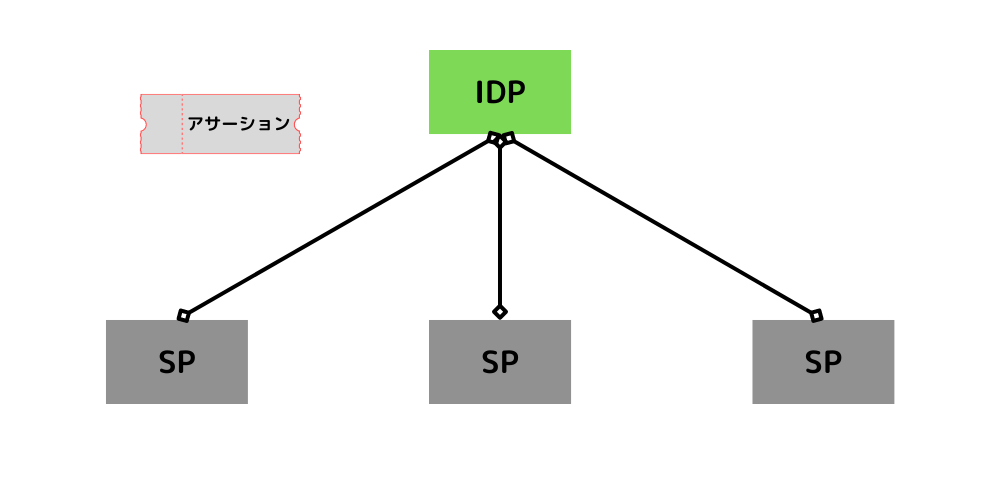
SAML認証はIDPとSPという2つのシステムで構成されいる。
| IDP | 大元のシステムに組み込む。 ログイン認証するユーザーの情報やSPのメタデータを保持する。 |
| SP | 各システムに組み込む。 IDPのメタデータを保持する。 |
上記2つのシステム間でアサーションという証明書をやり取りし、SSOを実現している。
アサーションがログインの証跡〜。

SimpleSAMLPHPの実装方法
Apacheのエイリアス設定
/etc/apache2/sites-available/ドメイン名.conf
→SSL設定時に生成したファイル
下記設定が完了したらSIMPLESAMLPHPのコンパネへアクセスする。
コンパネではメタデータの確認やSimpleSAMLPHPの設定ができる。
・・・略・・・
Alias /simplesaml /var/www/simplesamlphp/www
       <Directory /var/www/simplesamlphp/www>
           Require all granted
       </Directory>
・・・略・・・
セキュリティ観点
上記エイリアスの設定でSimpleSAMLPHPのコンパネがウェブ上に公開されることになるが、基本的にIDPとSP両方にメタデータが存在していないと成立しない認証方式のため最悪メタデータが流出しても問題ないと考える。(SimpleSAMLPHP側でログインIDとPW設定できる。)
ただし、システム的には不必要なデータを開示する意味は全く無いので、コンパネには開発者のみのIPアクセス制限を入れるなどしたほうが良い。
パスワード変更
simplesamlphp/config/config.phpの中で「'auth.adminpassword'」の値を複雑な値に変更しておいてください。
上記の設定とサーバー自体にDOS対策を入れておけば、一応は安全です。
SP登録(新規)
config/authsources.phpからdefault-spの値をコピーして、新規SP(任意名称)として登録。
test-sp' => [			//←任意で変更 (SP名指定)
        'saml:SP',

        // The entity ID of this SP.
        // Can be NULL/unset, in which case an entity ID is generated based on the metadata >
        'entityID' => null,

        // The entity ID of the IdP this SP should contact.
        // Can be NULL/unset, in which case the user will be shown a list of available IdPs.
        'idp' => 'https://test.com/simplesaml/saml2/idp/metadata.php',		//←任意で変更 (IDPエンドポイント指定)

        // The URL to the discovery service.
        // Can be NULL/unset, in which case a builtin discovery service will be used.
        'discoURL' => null,

        /*
         * The attributes parameter must contain an array of desired attributes by the SP.
         * The attributes can be expressed as an array of names or as an associative array
         * in the form of 'friendlyName' => 'name'. This feature requires 'name' to be set.
         * The metadata will then be created as follows:
         * <md:RequestedAttribute FriendlyName="friendlyName" Name="name" />
         */
        /*
        'name' => [
            'en' => 'A service',
            'no' => 'En tjeneste',
        ],

        'attributes' => [
            'attrname' => 'urn:oid:x.x.x.x',
        ],
        'attributes.required' => [
            'urn:oid:x.x.x.x',
        ],
        */
    ],
上記で作成したSPメタデータをコンパネからダウンロードする。(XML形式)
IDPがあるサーバーは基本的にSPと異なるため、IDP側サーバーに今回ダウンロードしたSPメタデータを登録する。
SPにIDPメタデータを登録
https://test.com/simplesaml/module.php/core/frontpage_federation.php
上記からSPのメタデータを取得(パース済みの奴)
※管理画面に入るとツールがあるためXMLをPHP値に変換することができる。
メタデータをmetadata/saml20-idp-remote.phpに貼り付け
$metadata['https://test.com/simplesaml/module.php/saml/sp/metadata.php/test-sp'] = [
    'SingleLogoutService' => [
        [
            'Binding' => 'urn:oasis:names:tc:SAML:2.0:bindings:HTTP-Redirect',
            'Location' => 'https://test.com/simplesaml/module.php/saml/sp/saml2-logout.php/test-sp',
        ],
    ],
    'AssertionConsumerService' => [
        [
            'index' => 0,
            'Binding' => 'urn:oasis:names:tc:SAML:2.0:bindings:HTTP-POST',
            'Location' => 'https://test.com/simplesaml/module.php/saml/sp/saml2-acs.php/test-sp',
        ],
        [
            'index' => 1,
            'Binding' => 'urn:oasis:names:tc:SAML:1.0:profiles:browser-post',
            'Location' => 'https://test.com/simplesaml/module.php/saml/sp/saml1-acs.php/test-sp',
        ],
        [
            'index' => 2,
            'Binding' => 'urn:oasis:names:tc:SAML:2.0:bindings:HTTP-Artifact',
            'Location' => 'https://test.com/simplesaml/module.php/saml/sp/saml2-acs.php/test-sp',
        ],
        [
            'index' => 3,
            'Binding' => 'urn:oasis:names:tc:SAML:1.0:profiles:artifact-01',
            'Location' => 'https://test.com/simplesaml/module.php/saml/sp/saml1-acs.php/test-sp/artifact',
        ],
    ],
    'contacts' => [
        [
            'emailAddress' => 'test@gmail.com', //管理者用メールアドレス
            'contactType' => '', //管理者用
            'givenName' => 'admin',
        ],
    ],
];
確認
任意のphpファイルを作成し、ソース内でSimpleSAMLPHPを呼び出す。
開発者ツールのネットワークタブを開いた状態で下記ソースが記述されているファイルにアクセスすると、IDPサーバーとSPサーバーにてリダイレクトが発生する様子が伺える。
最終的にアサーションの取得が成功するとブラウザ上にはデバッグ出力している$attributesの値が表示されているはずです。
<?php
require_once('./../../../simplesamlphp/lib/_autoload.php');

$auth = new SimpleSAML_Auth_Simple('test-sp');
$auth->requireAuth();
$attributes = $auth->getAttributes();

var_dump($attributes);
?>


![[備忘録]ZabbixにてMySQL監視する](https://otonan-syusyoku.work/wp-content/uploads/2021/09/IT基礎-300x150.png)


